How To Change Vacuum Pump Exhaust Filter - Vac310

How to Change Pump Exhaust Filter (310-32, Gray Pump) | JVR Vac310

” Today, we will take you through a step-by-step process of replacing the exhaust filter as the vacuum pump has been constructed to make self-service possible.”

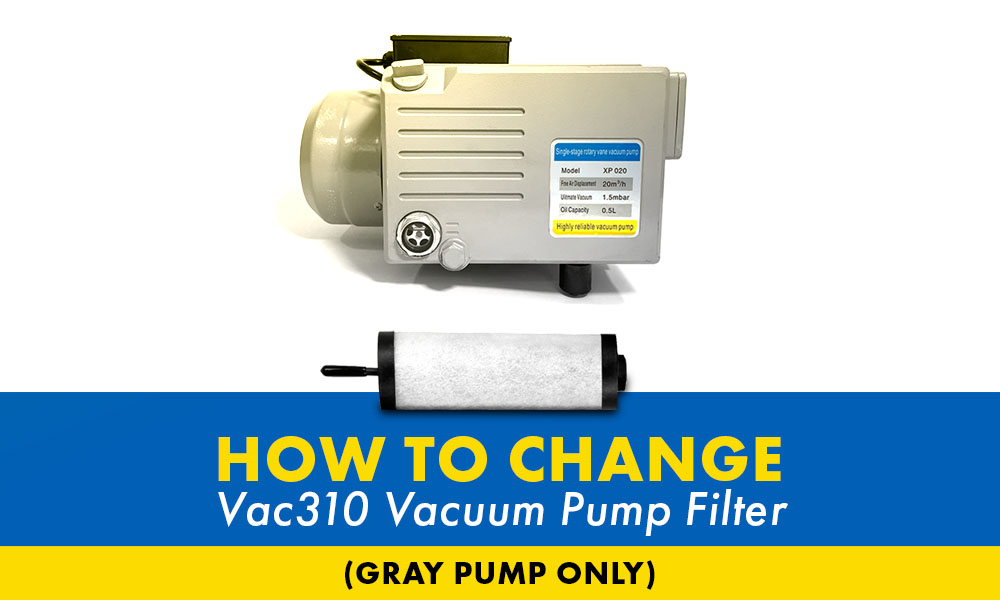
A very common question for us to receive is: “How do I replace the vacuum pump exhaust filter in my Vac310?”

Today, we will answer that question simply.

Have you noticed that your Vac310 chamber vacuum sealer is performing with diminishing quality, producing smoke or even an oil mist? These are a select few examples pointing to the possibility that your pump exhaust filter may need replacing. Today, we will take you through a step-by-step process of replacing the exhaust filter as the vacuum pump has been constructed to make self-service possible. As a result, you can avoid the extra cost of paying for a technician to fix something which can easily be done on your own!

How To Change Vacuum Pump Exhaust Filter - Vac310
JVR Vac110 - Chamber Vacuum Sealer

All VacSeries sold by JVR Industries are designed to be constructed with an oil-lubricated filtering system installed. This device ensures materials such as dust and other impurities do not pass through and reach the vacuum pump components. The application of an oil filtration system ensures our vacuum pumps achieve high quality and durability.

These vacuum pumps not only offer an effective system but are also a source of sustainability. Similar to the full recovery water fluid system of gas-powered liquid ring vacuum pumps, the oil in our vacuum pumps is fully recycled to prolong the need for a refill. Some systems function in a way where the liquids leak out slowly over time so much more is being used. Our vacuum pumps avoid this by creating an oil mist which is caught before the the air is expelled from the unit. The droplets conjoin and are recycled back into the system. Therefore, these applications result in a system that offers a longer range of time between liquid refills.

How To Change Vacuum Pump Exhaust Filter - Vac310

If you own the older model of the Vac310, confirm the filter ordered is the GRAY pump with the part number 310-32. We also carry filters for a our older Vac310 vacuum pump that appear the same but are labeled as a WHITE filter with the part number 310-33.

We recommend you change the exhaust filter about once a year to maintain peak momentum for filtering quality. The range of time between replacements may vary depending on the amount of use.

A strong suggestion would be to order 1-2 new filters along with the initial purchase of your Vac310/Vac410 to allow for ease of momentum throughout your replacement process.

Replacing the exhaust filter is rated moderate difficulty and is expected to take around 30 minutes.

#2 Phillips

10mm & 13mm combination wrenches

1) Step #1 – Unscrew all 6 screws from the panel on the back of the unit using the #2 Phillips (make sure to keep washers with the screws).

  • Hold the panel when you get to the last screw to keep it from falling by pressing toward the unit

2) Step #2 – Remove panel

3) Step #3 – Add 2 in x 4 in boards under each back foot to tilt the unit. This creates space to access the vacuum pump feet below the frame of the unit.

  • CAUTION: Be wary of tilting the unit too much. The weight of these vacuum pumps is not light due to the size and stainless steel material. Tilting a unit of this mass could be extremely dangerous if it were to fall! To avoid this, we suggest no more than two 2 in x 4 in boards to prop the unit to limit the chances created of the unit falling.

1) Step #1 – Use the 13mm combination wrench to loosen the nut securing the foot of the pump under the unit then unscrew it by hand.

2) Step #2 – Lift and rotate the pump to detach from the bottom.

1) Step #1 – Separate the cap found on the vacuum pump by removing the four screws with #2 Phillips.

2) Step #2 – Withdraw the filter from inside the pump

3) Step #3 – Use the 10mm wrench to remove the cap from the filter

4) Step #4 – Make sure to remove all contents used to secure the cap including the washer

1) Step #1 – Unpackage new filter

2) Step #2 – Remove the rubber piece found on the thread

3) Step #3 – Add all contents on the new filter in the same order you found it on the old filter

  • Washer
  • Spring
  • Washer
  • Cap

4) Step #4 – Press all contents down simultaneously so everything is even

5) Step #5 – Screw the nut on to secure the cap and tighten it with a 10mm wrench

6) Step #6 – Confirm O-Ring is placed on the new filter (ships like this)

7) Step #7 – Insert the filter back into the pump

8) Step #8 – Reinsert 4 screws with the Phillips

1) Step #1 – Slide the feet of the pump back into holes on the bottom of the unit and secure it

2) Step #2 – Ensure bolts are secure with the 13mm combination wrench

3) Step #3 – Reinstall the back panel and use the Phillips to secure the screws

Vac310 Vacuum Pump Exhaust Filter

If you are looking for a new exhaust filter for your vacuum sealer, click here to access the direct link to order. Additionally, we offer same-day shipping so you do not have to miss a day of work! 

Order a QUART or GALLON of our VacOil along with your new filter purchase! 

Questions? Contact our service department which provides detailed, educated, and personable assistance. Or, watch the video found below that provides further details and a visual for the instructions provided above. 

Want to read more articles like this?

Click below!

Read more
VST50 - Vacuum Tumbler Overview

Basic Overview of the VST50 – Vacuum Tumbler

“Expedite your marination process by upgrading to a VST50-vacuum tumbler that provides precision and efficiency.”

VST50 - Vacuum Tumbler


Marinating large amounts of meat is sometimes challenging. Generally, the procedure goes something like this – You add fresh cut meat into a large bowl along with an immaculate marinade mix of soy sauce, possibly some ginger, and spices like salt and garlic to taste. Following several hours, you retrieve the marinaded meat from the fridge for cooking only to find all the marinade has pooled to the bottom of the bowl. What you thought was marinating meat did not, in fact, marinate. In other cases, you had to wait 24 hours for a full marinade on your beef products. Time is the essence when you are doing mass deep tissue marination of food for resale.

Eliminate this frustrating outcome with a VST50-vacuum tumbler that provides a transforming experience for marination. Increase the output and decrease the time for marination to incomparably improve the procedure for commercial-grade results.


Expedite your marination process by upgrading to a vacuum tumbler that provides precision and efficiency that does not result from solely placing a bowl of contents in the fridge to sit. A vacuum tumbler simply does the work of marinating meat for you.  With a drum capacity of 50 lbs., the unit provides ample room to marinate any desired combination such as chicken with a soy sauce-based marinade, or fish with a citrus juice-based marinade in bulk with little effort on your part. Get deep tissue marination results in a fraction of the time!


Because of the constant churning of the tumbler, the marinades will evenly contact all meat surfaces even in bulk amounts for the full duration of marination time. Additionally, what changes the game to create a robust explosion of flavor is the vacuum system. The vacuum pulls air out of the drum which causes the meat contents to expand and allowing the marinade to reach every surface of the meat to bring out more flavor where even the most basic ingredients can be a tasty meal. The pull on the meat produced by the vacuum also benefits in transforming even tougher cuts, delivering a tender texture full of flavor.

VST50 - Vacuum Tumbler


Removable Baffles: Effortless removal makes cleaning easy and ensures sanitary use.

Moisture Collection Reservoir: Functions to collect liquids in order to protect the vacuum oil pump.

Adjustable Tumbler Time: The unit is shipped with set intervals from 0-4 hours. If you require different time intervals, no worries! The times are adjustable via installed dipswitches to match the precision of your marinating process! If interested, then contact the JVR Industries service department for detailed instructions.

50 lb. Drum Capacity: Provides ample space to marinate meat in bulk!

Analog Gauge: This provides an easy way to check the pressure of the amount of vacuum you require.

Stainless Steel Construction: Ensures sustainability, ease of cleaning, and resists corrosion.

Oil Lubricated Vacuum Pump: Longer life span, quieter operation, and pulls higher vacuum than dry piston pumps.

These vacuum tumblers are constructed carefully to provide ease of operation, therefore providing you with simplicity to acquire the desired results.

Prepare the Unit for Loading

Upon unpackaging, place your unit on a flat, solid surface with space to work around it. You will find an unattached component on top of the unit. This is the moisture collection reservoir and does not come preinstalled. It functions to prevent liquid marinade from getting sucked back into the vacuum pump, and, as a result, protecting the oil pump from damage.


How to Install the Moisture Collection Reservoir

To install the reservoir, first, locate the screws on the back of the unit opposite the control panel and confirm the screws have not loosened during shipment. The screws can be secured by lifting the cover and tightening them from the inside of the unit. Secondly, connect the hose found on the unit by simply pushing it onto the quick disconnect fitting found beside the screws. Initially, you will feel a click, but this does not ensure a secure seal until you hear a second click. Lastly, line up the holes found on the back of the reservoir to the screws on the unit, insert the screw, and slide down to attach.

VST25 or VST50 - Removable Baffles Shot


As stated, this tumbler has the capacity to hold up to 50 lbs. of meat! The following steps will take you through how to load your drum for marination.

1) Step #1 – Lift the drum off the rollers and place it upright onto a flat, stable surface.

2) Step #2 – Remove the lid. Unhook the three clasps by lifting the levers and displacing the clasps.

3) Step #3 – Confirm the fins inside the drum are tightened to prevent loosening while tumbling.

4) Step #4 – Load chicken, beef, or any other meats along with a marinade into the drum.

5) Step #5 – Reinstall the lid and ensure it is centered by feeling around the perimeter.

6) Step #6 – Lastly, reinstall clasps (meant to temporarily secure the lid until the vacuum is applied).


The vacuum system is made easy with only a couple of steps to follow! The system is designed to be applied either with the drum upright or set back onto the unit. We recommend getting into the habit of applying the vacuum with the drum upright in case you happen to forget to secure the clasps.

Before beginning, check to ensure the canister on the moisture collection reservoir is tightened by twisting the canister until secure. Additionally, ensure the oil is filled by simply looking through the sight glass.

Now follow these easy steps!

.

1) Step #1 – Locate the suction cups on the hose hung on the back of the unit as well as the hose from the top of the drum lid.

2) Step #2 – OPEN the valve on the hose entering the drum.

3) Step #3 – Turn ON the vacuum system using the switch on the control panel.

4) Step #4 – Press the suction cups together for a few seconds until they hold independently.

5) Step #5 – Monitor the pressure using the gauge located on the control panel.

6) Step #6 – Turn OFF after the vacuum reaches the desired vacuum.

7) Step #7 – BEFORE disconnecting the hoses, CLOSE the valve on the hose running to the drum to ensure air does not leak out.

8) Step #8 – Disconnect the hoses.

9) Step #9 – Finally, reinstall the drum back onto the unit (make sure the drum reaches the very back to the stops).

You are now ready to begin the tumbler cycle for marinating!


In order to prepare the tumbler cycle to marinate meat, locate the control interface at the front of the unit. You will find these three main controls.


On/Off Switch

Tumble Time

Speed Control (Potentiometer)


Set these controls to the desired settings to perfect your recipe. Then switch the ON/OFF switch to ON, and stand back for the marinating process!


JVR Industries also carries the TM series tumblers distributed by Promarks. JVR Industries has been partners with Promarks for about 20 years and can ensure the unit is constructed carefully to offer the utmost quality for our customers.

Want to read more articles like this one?

Click below!

Read more
How To Prevent Freezer Burn - VacNews Article

How To Prevent Freezer Burn

“Chamber vacuum sealing removes 99.8% of air to ensure that no chance for freezer burn is possible!”

How To Prevent Freezer Burn - VacNews Article

Preventing freezer burn is something we all want to achieve in our households.  Most everyone has experienced the unpleasantness of grabbing a package of pepperoni out of your freezer, anticipating a nice homemade pepperoni pizza. To your dismay, the whole bag of meat that has been freezing for longer than you had anticipated has turned a strange brown color and you know from experience it does not taste good! This is a frustrating place to be and we would like to address this first-hand.

Today, we are here to help you with the question of how you can stop this situation from happening to you if you are looking to freeze meat or any other products. Based on experience, we have found that if you invest in the right materials, damage due to freezing your product will become the least of your worries. We will walk you through a discussion of how freezer damage occurs and how JVR Industries provides the soundest way to affirm that you can freeze any of your products without forming freezer burn for an unbeatable range of time!

What is Freezer Burn - VacNews

Freezer damage usually occurs around a couple of months into freezing a product and can be spotted by the appearance of discoloration, pink striations, or ice crystals forming on the body surface of a freezing product. If you happen to not take a close enough look, you will assuredly notice the bland taste once you bite into the gritty or toughened texture of the product that had been freezing.

Freezing a product for too long without proper precautions can cause frozen spoilage. This will take effect prominently on the color, taste, texture, and aroma of the food you freeze.

Now, it is often the myth that freezer-damaged food is unhealthy to eat. This is not necessarily the case and it does not contain bacteria. With this in mind, you might be able to feed freezer-burnt meat to your animals, but to the human species, we can certainly agree that consuming this is not preferred.

What is Freezer Burn - VacNews

Food damage due to freezing occurs as a result of a process called desiccation meaning the removal of moisture. The atmosphere within a freezer is dry due to the moisture freezing. If the freezing product is exposed to this dry atmosphere, the water particles within the product want to escape to compensate for that lack of moisture. The escaping water particles end up freezing on the surface of the product to create ice crystals upon contact with the freezing temperatures and a discolored appearance as the moisture is pulled out and freezes. Generally, the slower the product freezes, the larger the water particles grow. Consequently, the bigger the size of the water particles escaping, the more cell membranes within the product break causing alterations in smell, look, and taste.

Multiple protocols exist to avoid freezer damage. We have seen that some of the most common include ensuring the temperature in the freezer is even colder than freezing temperature to minimize the amount of time it takes for the product to freeze, limiting the number of times the freezer is open which decreases the temperature causing the freezing product to thaw then have to freeze over again, and packaging food to freeze in a plastic zipper bag or storage container.

Although these protocols may be effective for a time, how would you directly address the reason freezer damaged food occurs? The answer is simple! We have found that chamber vacuum sealing is the most effective and efficient way to ensure your product does not come into contact with the dryness in the freezer, and therefore, eliminates the need for the moisture to escape the product. Chamber vacuum sealing removes 99.8% of air to ensure that no chance for freezer burn is possible! As a result, the product will maintain its moisture and not go to waste.

JVR Vac100 - Chamber Vacuum Sealer | best chamber vacuum sealer for home use
JVR Vac100 - Chamber Vacuum Sealer

Chamber vacuum sealing your product before freezing takes out up to 99.8% of the air out of the pouch ensuring the product has the least possible contact with the dry atmosphere in the freezer. While the vacuum sealer pulls close to all the air out, it also creates an airtight seal eliminating the possibility of any entering or leaving the pouch. With minimal contact and no possibility of it leaving or entering, the product is allowed to hold its moisture and maintain optimal quality!

Plastic zipper bags and storage containers may store your product for a shorter range of time. Still, the amount of space that is left within the packaging is outstanding compared to what is accomplished by a chamber vacuum sealer. This substantial difference causes a much greater risk of freezer damage using alternative options for freezing products.

Standard plastic zipper bags are not capable of being used for vacuum sealing in addition to being permeable due to the materials used to manufacture them. The likelihood of air seeping into the bag and, further, causing freezer damage is possible. Vacuum sealing using a pouch guarantees an airtight seal and eliminates that chance allowing you to freeze your product knowing the chance of freezer damage is at the minimum.

JVR Industries stands out from our competitors as we have specialized in the vacuum sealing industry since 1972. That is over 50 years of experience!

Our company prides itself on carrying chamber vacuum machines that produce results to stand out from our competitors. The chamber vacuum machines we carry, such as the Vac100 and Vac110, pull around 99.8% of air from pouches before sealing!

Considering the amount being pulled during vacuum sealing, this allows for minimal contact with the dryness within the freezer. Accordingly, the product maintains its moisture in contrast to alternative packaging options!

How To Prevent Freezer Burn - VacNews Article

We’ve Experienced & Experimented With Products In-House To Confirm!

Many of us own our own vacuum sealers and have seen the difference firsthand! Our years of service in the vacuum packaging industry have also provided lots of data and experience with freezer burn. Lastly, we recently tested our Vac100 in-house by freezing various products! Currently, we have salmon and soup that has been freezing for 2+ years. Both have no sign of freezer damage to date! They look as fresh as the day we sealed them.

Foodsaver and VacFlex

What About An External Vacuum Sealer?

Some companies may suggest the alternative of using edge, suction, and external vacuum sealers. Still, these cannot vacuum seal liquids and they remove 19.8% less air than a chamber vac with an oil pump. The chamber vacuum sealers we provide have the option to package any products containing liquids or any amount of moisture that is not provided by an external vacuum sealer. If you freeze products containing liquids, a chamber vacuum sealer is ideal.

360 West Magazine - Vac100

If you are looking to order a chamber vacuum sealer to utilize these methods, we have just the product for you! JVR Industries carries top-notch chamber vacuum sealers, such as the Vac100 or Vac110, that we have continually ensured are more than fit to produce the results you need to efficiently and effectively seal your products for freezing!

To learn more or to order, click here to browse our selection of economy line chamber vacuum sealers.

Want to read more articles like this? Click below!

Read more
Win a free JVR Vac100

JVR Vac100 Giveaway

Congratulations Anthony D!

Today, we are announcing a giveaway for an $899 chamber vacuum sealer – The JVR Vac100!

JVR Vac100 Giveaway

JVR Vac100 - Chamber Vacuum Sealer | what is a chamber vacuum sealer

The JVR Vac100 is the best all-around chamber vacuum sealer equipped with features that set it apart from our competitors. With a commercial grade, oil-lubricated, rotary-style vacuum pump, the Vac100 is capable of achieving vacuum seal levels exceeding 29.5″ Hg and of evacuating 99% of the air in a 40-second vacuum cycle! Reap the oil pump benefits of a longer life span, better vacuum draw, and, overall, less noise compared to dry piston vacuum pumps found in food saver units. Self-serviceability is ease with the hinging body mechanism. Additionally, the 12.3″ seal bar handles a variety of pouch sizes to package your food items.

No longer need to create a dedicated space in the basement, garage, or elsewhere for your future industrial food sealer. The low-profile design measures 8.3” with the lid closed. This being the case, the JVR Vac100 is one of the only chamber vacuum sealers to be able to fit under almost every cupboard on the kitchen counter! This provides a modern look to complement any kitchen while still providing ample room with a 4.3” deep chamber to seal large items such as whole chickens and roasts.

An Overview of the Functions Provided by the JVR Vac100

Our unit is capable of so much more! Your options include, but are not limited to, vacuum sealing liquids, sealing up to two half gallon mason jars, sealing 2 bags with 6-inch-wide mouth simultaneously, sealing wine bottles, accessory capability, retort capability, and more! The quality and efficacy of the seal will leave you with no doubt of eliminating the chance of freezer burn during food storage while also having the capability of sealing delicate foods without crushing.

JVR Vac100 - Chamber Vacuum Sealer | what is a chamber vacuum sealer

What Sets the JVR Vac100 Apart?

While you can find decent units from multiple companies, what sets us apart is our experience. JVR Industries has been in the vacuum packaging industry since 1972! We still service units sold 20+ years ago and we plan on doing the same for the JVR Vac100.

Additionally, JVR has been specializing in vacuum packaging for a long time, which equips us with unmatched customer service. You can expect a same-day diagnosis and non-automated telephone services. The knowledge our service department has acquired is paramount in allowing you to receive the service you require with assurance.

GIVEAWAY HAS ENDED. WINNER HAS BEEN SELECTED.

Now is your chance to experience all the benefits and for free!

To sign up for the giveaway, access the link below:

Want to read more articles like this? Click below!

Read more
How To Seal Mason Jars Vac110

How to Vacuum Seal Mason Jars | JVR Vac110

“Our stainless steel vacuum sealer can seal multiple mason jars simultaneously with both effectiveness and efficiency to secure a superb airtight seal.”

Today we cover the topic: “How to Vacuum Seal Mason Jars | JVR Vac110”

Today we will discuss how to vacuum seal Mason jars using the JVR Vac110 Chamber Vacuum Sealer. In addition to providing endless possibilities such as vacuum sealing meat to avoid freezer burn, providing a delicious sous vide experience right from your own home, or sealing cut bags to store your dried fruit, the Vac110 Chamber Vacuum Sealer is also well equipped to vacuum seal your Mason jars!

How To Seal Mason Jars Vac110

Consistent adjustments have been made to the Vac110 Chamber Vacuum Sealer to ensure top notch quality and keep our product standing apart from vacuum sealers provided by our competitors. Our stainless steel vacuum sealer can seal multiple mason jars simultaneously with both effectiveness and efficiency to secure a superb airtight seal.

The following dives into explaining what can be vacuum sealed using this process as well as a detailed account of how you can carry out this process simply from your own countertop.

While the vacuum sealing process using retort pouches offers a wide variety of options, the opportunity to seal Mason jars provides a new category to store more delicate foods for meal prep. These include dry, shelf-stable foods such as grains, dried fruits and baking products. This process is NOT meant to package liquids such as soup, sauces, canned fruits, or any items containing moisture even it is shelf-life safe.

Mason Jars Isolated - Vacuum Seal Mason Jars Vac110

Note: Keep in mind this process does not replace the standard sealing process using water baths.

JVR Vac110 - Chamber Vacuum Sealer

1-4 of the 16 oz jars or 1-9 of jars of any size up to 8 oz can be sealed simultaneously using the Vac110 Chamber Vacuum Sealer.

The Vac110 Chamber Vacuum Sealer vacuum seals any Mason jar size up to 16 oz.

JVR Vac110 - Chamber Vacuum Sealer

If you require space to seal 16 oz – 64 oz Mason jars, then we carry just the product for you! The Vac100 Chamber Accessory (3-gallon) seals 1-2 Mason jars up to 64 oz (½ gallon) simultaneously in addition to performing functions such as expedited brining, marinating, and more!

Vac100 Chamber Accessory

Overview of Vac110 Chamber Vacuum Sealer Control Panel

Stop: Stops any cycle (vacuum sealer or cooling cycle) and exits out of these cycles simultaneously.

Settings: Cycles through vacuum time, seal time, and cool time.

Increase/Decrease: Adjusts any of the cycle times when inside of Settings.

Vac110 Contrl Buttons - Vacuum Seal Mason Jars Vac110

To access all cycle times hit “SETTINGS” one time. You should see the LED near VACUUM on the control panel. Now, hit “INCREASE” or “DECREASE” to adjust the VACUUM cycle time.

To access the next cycle time, simply hit “SETTINGS” two more times to bypass the GAS cycle and enter the SEALING cycle. Gas is put on every control panel because of the gas option potential, but all of the units do not have a gas option installed. (We do not sell a gas flush option on the Vac110. Only models above the Vac110 have this option.) Now, hit “INCREASE” or “DECREASE” to adjust the VACUUM cycle time.

Select “SETTINGS” one more time to access the COOLING cycle time.

The chamber inside the Vac110 is slightly uneven so some factors should be considered for effectiveness of the seal.

Step 1: Set the mouth lids evenly and firmly over the mouth of the selected quantity of Mason jars.

Step 2: Screw the band on ONE thread of each jar in order to keep the mouth lid in place. If the band is too tight, then the sealing process will be altered.

Step 3: Place jars upright in the center of the chamber.

Vac100 Mason Jars Placement

Easy! Close lid of the chamber and the process will begin automatically.

Following sealing, a dimple should form on the top of the mouth lid. This shows the process has created an airtight seal. You can further confirm a fully sealed mouth lid by attempting to lift lid or tip the can upside down.

Test Dimple Vac110

If no dimple forms, this suggests you have a failed seal. Feel free to then repeat the process after confirming the mouth lid is on evenly over the mouth of the jar. Please do bear in mind that mouth lids can distort after a vacuum sealing in a Vac110 chamber vacuum sealer. If you suspect distortion, we suggest getting a new lid.

There you have it – yet another use the Vac110 can provide to make life a little simpler and more efficient in just a couple easy steps!

Want to read more articles like this? Click below!

Read more
vacuum seal mason jars - vac100

How to Vacuum Seal Mason Jars in a JVR Vac100

“Our all-around best chamber vacuum sealer can seal up to two half-gallon mason jars simultaneously!”

How To Vacuum Seal Mason Jars - Vac100 - Latest Video

Today, we go over “How to Vacuum Seal Mason Jars in the Vac100 – chamber vacuum sealer.” 

Today we will discuss how to vacuum seal Mason jars using the JVR Vac100 Chamber Vacuum Sealer. In addition to providing endless possibilities such as vacuum sealing meat to avoid freezer burn, providing a delicious sous vide experience right from your own home, or sealing cut bags to store your dried fruit, the Vac100 Chamber Vacuum Sealer it is also well equipped to vacuum seal Mason jars!

JVR Vac100 - Chamber Vacuum Sealer

Consistent adjustments have been made to the Vac100 Chamber Vacuum Sealer to ensure top notch quality and to keep our product standing apart from vacuum sealers provided by our competitors. Our all-around best chamber vacuum sealer can seal up to two half-gallon mason jars simultaneously!

The following dives into explaining what can be vacuum sealed using this process as well as a detailed account of how to carry out this process simply from your own countertop.

While the vacuum sealing process using retort pouches offers a wide variety of options, the opportunity to seal Mason jars provides a new category to store more delicate foods for meal prep. These include dry, shelf-stable foods such as grains, dried fruits and baking products. This process is NOT meant to replace the common canning practice that seals non-shelf stable products such as salsas, liquids, and more.

Mason Jars Isolated - Vacuum Seal Mason Jars Vac110

Note: Keep in mind this process does not replace the standard sealing process using water baths.

Inside the chamber of the unit, you are able to fit 4 – 8 ounce (236ml) regular mouth Ball mason jars upright (as pictured). Sealing multiple mason jars at one time outpaces all external edge, suction vacuum sealers in the market today! Needing more space for those larger mason jars? No problem! Though this may not be a big vacuum sealer, there are other options like the external chamber or our JVR Vac110.

How To Program the Vac100
JVR Vac100 - Chamber Vacuum Sealer
Vac100 Mason Jars

If you require space to seal 16 oz – 64 oz Mason jars, then we carry just the product for you! The Vac100 Chamber Accessory (3-gallon) seals 1-2 Mason jars up to 64 oz (½ gallon) simultaneously in addition to performing functions such as expedited brining, marinating, and more!

Vac100 Chamber Accessory

Inside the 3-gallon chamber accessory, you are able to fit 2 – 64 ounce (1/2 gallon) wide-mouth Ball mason jars upright. Additionally, you can fit up to 4 – 32 ounce (946 ml) regular mouth Ball mason jars upright in the external chamber accessory. Using the chamber accessory, our customers are able to vacuum seal the largest mason jar in any chamber vacuum sealer in this price range! Commercial capability is unlocked with this modern vacuum packaging unit. Click here to buy the chamber accessory today!

Vac100 Chamber Accessory
Vac100 and 3 Gallon Chamber Accessory
Vac100 Chamber Accessory

Overview of Vac100 Chamber Vacuum Sealer Control Panel

Power: NOTE: This button only turns the display on and off, it does not disconnect the power supply. Always unplug the machine when disconnecting power is necessary.

Stop: immediately stops the cycle and vents the lid or exits after making a settings adjustment.

Settings: for changing program number or making adjustments to the vacuum, seal, and cool times.

Increase: Used for making setting adjustments.

Decrease: used for making setting adjustments and perform SKIP function when the machine is cycling.

Pump: Turns on the vacuum pump. Used for evacuating air from accessories.

Vac100 Control Board Buttons - Vac110 and Vac310 Comparison

Step 1: Check that the unit is plugged in.

Step 2: Check that the rocker switch on back of machine is switched to ON.

Step 3: Select Power on the main display.

Step 4: Select Settings. Select an option that is not already dedicated to a specific function (i.e. P3). The Vac100 is preset so that P0 and P1 are already dedicated (P0 for light vacuum sealing on chamber vacuum pouches; P1 for full vacuum sealing on chamber vacuum pouches).

Step 5: Select Settings. Set vacuum cycle time (use increase or decrease buttons). We recommend 50 sec in order to achieve 99% of air removed.

Step 6: Select Settings. Set sealing time to 0.0 sec.

Step 7: Select Settings. Set cooling cycle time to 0.0 sec.

Step 8: Select Setting. YOUR PRESET IS NOW SAVED AND READY!

The recess of the chamber inside the Vac100 is slightly uneven so some factors should be considered for effectiveness of the seal depending on how many jars are being sealed simultaneously.

Step 1: Set a mouth lid evenly and firmly over the mouth of the selected quantity of Mason jars.

Step 2: Screw the band lid on by ONE thread of each jar in order to keep the mouth lid in place. CAUTION: If the band is too tight, then this could cause a failure and even an implosion in some cases. Please do not overtighten the lid.

Step 3: Place jar/jars upright in the center of the chamber.

Vac100 Mason Jars Placement

Easy! Close lid of the chamber and the process will begin automatically. The hinging side of the lid engages with the cycle start switch which automatically engages the vacuum cycle.

Following sealing, a dimple should form on the top of the mouth lid. This shows the process has created an airtight seal. You can further confirm a fully sealed mouth lid by attempting to lift lid or tip the can upside down.

If no dimple forms, then repeat the process after confirming the mouth lid is on evenly over the mouth of the jar. Please bear in mind that the mouth of the mason jar does need to be free of dust and debris, If the lid has been used before, the lid is most likely distorted from any previous vacuum cycle and this is why we suggest replacing them.

There you have it – yet another use the Vac100 Chamber Vacuum Sealer can provide to make life a little simpler and more efficient in just a couple easy steps!

Want to read more articles like “How to Vacuum Seal Mason Jars in a JVR Vac100?” Click below!

Read more
Vac110 Retort Bar Assembly

How To Set Up The Retort Bar Assembly: JVR Vac110

A very common question for us to receive is: “How do I set up my retort bar assembly for my Vac110?”

Today, we will answer that question simply!

Your Vac110 Chamber Vacuum Sealer has the capability for many functions such as vacuum sealing chamber pouches and glass jars as it is automatically paired with the standard seal bar. However, with the addition of the retort bar assembly, those options are widely expanded. Imagine having the alternative to save space from using cans and jars for your poultry or pet food packaging and replacing them with airtight retort pouches that produce the same, if not better, results for storing your canned foods. In addition, instead of using a can opener to open the metal cans, you simply use the tear notch on the retort pouch and voila!

Vac110 Retort Bar Assembly

How does the retort pouch production differ from the chamber vacuum pouches that makes this retort pouch revolutionary? A retort canning pouch is a sterilizable flexible pouch constructed with a mix of various layers of thin metal foils and plastics. This retort pouch design allows it to withstand temperatures and pressures used during the food packaging process that can replace using the traditional industrial canning methods.

JVR Vac110 Chamber Vacuum Sealer

The process for retort food canning removes all air from within the pouch following sterilization by heating to a temperature of about 250° for around 50 minutes. The retort bar then seals off the pouch once the sterilization and full air removal has taken place and your sealed pouch is now ready to store safely away!

The following information covers common uses of the retort bar, steps to install your retort bar, approaches to identifying the differences between the standard seal bar and the retort bar, seal and cooling times recommended for your mylar or retort pouches, and finally, methods to ensure proper seal integrity.

NOTE: The retort bar is not meant to seal chamber vacuum pouches!

The retort bar assembly is an 11.0″ bar with a heat strip size of 3.5mm. These features provide additional options for your food packaging process because it is capable of high pressure and heat used to seal heavy mil flexible retort pouches including mylar and retort pouches.

Common uses for the retort seal bar among our customers include sealing:

Retort canning pouches (e.g. for various types of food packaging such as raw materials or shelf stable goods)

Mylar pouches

Coffee bags

retort bar assembly

The installation process is easy and requires zero tools!

Step 1: Locate the standard seal bar within the chamber when you open the cover.

Step 2: Simply remove the Standard Seal Bar by lifting it out of the unit.

Seal Only Cycle - Seal Bar Assembly Diagram

Step 3: Replace with the retort bar by ensuring the bag clips are located on the operator side of the chamber and align the holes with the seal bar lift piston rods.

Three easy processes are used to identify the differences between the standard seal bar and the retort bar.

1. Heat Strip Size

The heat strip is the black metal strip that runs along the whole bar. The Standard Seal Bar is a flat, 6 mm strip while the retort bar is a concave shape, 3.5 mm strip that provides the pressure

This difference can be identified by simply sliding your finger across each heat strip. If the heat strip is flat, then it is a standard seal bar. If you feel a hill or ridge along the heat strip, then it will be a retort bar.

Identify Bar Assembly

2. Width of Bar

Look down the end of each bar. The retort bar appears narrower while the standard seal bar is wider (6 mm).

3. Label

The standard seal bar does NOT have a label. The retort bar always has a label located at the center of the bar labeled “RETORT”.

When considering using the retort bar in place of your standard seal bar for the retort packaging process, specific processing times are recommended depending on what retort pouches are used. We will review these specifics with the mylar pouches and retort canning pouches.

Note: Mylar retort pouches are not sold by JVR Industries, but are provided through Pleasant Grove Farms at topmylar.com. The seal integrity of a mylar retort bag has been tested in-house and has been found to be exceptional. 

Recommended Seal and Cooling Times for Mylar Retort Pouches:

Seal Time: 2.4 sec.

Cooling time: 5.0 sec.

Recommended Seal and Cooling Times for a Retort Pouch:

Seal time: 2.8 sec.

Cooling time: 6.0 sec

JVR Vac110 - Chamber Vacuum Sealer

Four methods should be practiced during the sealing process to ensure exceptional seal integrity that will provide you with safe packaging for storage.

1. MOUTH FOLD – Fold over the pouch mouth leaving about 2-4 inches of clearance to avoid residue in the seal area from moist products.

2. PREVENT WRINKLES – Lay pouch flat across the retort bar assembly, checking that the mouth is inserted entirely in the bag clips. If sealing a low profile product, then place filler plates below to fill the void.

3. INSPECT WELD – Check that the entire mouth of the package shows a perfectly continuous crosshatch pattern. Small blemishes should not be a concern, though you can check the strength of the potentially compromised area using the resistance test.

4. RESISTANCE TEST – Tug at the mouth of the pouch to check for complete adhesion following sealing. A solid weld/seal has taken place if you are unable to rip apart the seal.

Vac100/Vac110/Vac310 Seal Bar Assembly

As a reminder, JVR Industries does not proclaim expertise in the retort process because we are purely a chamber vacuum sealer packaging company. We have, however, tested the process with both mylar and retort pouches in-house and have been successful. Many of our experienced customers will readily recommend the addition of a retort bar because it expands the possibilities for your business or hobbies!

Click here to order the Vac110 retort bar assembly! 

Questions? Watch the video attached below for further visual instruction. Or, contact our highly knowledgeable and personable service department who would be glad to answer any of your questions!

Want to read more articles like this? Click below!

Read more